Pages

Monday, June 27, 2011

Publishing on Custom Domain

“If there were in the world today any large number of people who desired their own happiness more than they desired the unhappiness of others, we could have paradise in a few years.”

– Bertrand Russell


I have been thinking of publishing this blog using my own domain. In fact I have been nurturing this idea for the past six months or so but even the posting has been very irregular due to various reasons. Yesterday I switched over to my own custom domain. So the URL of this blog has been changed from http://ideagold.blogspot.com to http://www.ideasgold.com. I couldn’t get the desired domain ideagold.com but this is alright for me! Searches for this blog using the earlier URL will be redirected to the new URL. So you won’t have any problems in accessing the posts on this blog. Even if you type the URL as http://ideasgold.com (without the www), you will be directed to this blog.

But remember the domain is ideasgold.com and not ideagold.com

I still love to use the convenient blogger platform and the free hosting facilities offered by Blogger. The use of the custom domain www.ideasgold.com may hopefully prompt me to be more regular in updating this blog. After purchasing the domain from godaddy.com, the switching to the custom domain was a very easy process, taking less than 20 minutes. I’ll write a post on this shortly.

Friday, June 24, 2011

To Remove (Disable) Navbar (Navigation Bar) from a Blogger Blog

Many bloggers using the Google Blogger platform prefer to hide the Blogger navbar (navigation bar) in their blogs. You can see the horizontal navbar at the top of your blog. It contains a search box in which you can type in words or phrases (and hit the enter key) to search for in your blog. This is definitely a useful feature. But you can provide a google search box anywhere in your blog when you opt for disabling the navbar. The more important feature of the navbar is a ‘Next Blog’ button which you can click and navigate to other blogs at random. Additionally the Blogger navbar contains a ‘Share’ button, a ‘Report Abuse’ button, a ‘Create Blog’ button and a ‘Sign in’ button as shown in the following figure (which you may click to enlarge if required):

When you disable or hide the navbar, you will lose the features offered in the navbar. The main reason why many bloggers hide or disable or remove the navbar is that the blog will get a little more professional look. But if you are still using the blogspot domain for publishing your blog, there is not much to gain by way of the professional look. If you are publishing your blog using your own custom domain (such as yourblog.com instead of yourblog.blogspot.com), your blog may look more professional even if you make use of the free hosting provided by Blogger.

I have disabled the navbar in a couple of my blogs. But I can enable it at any time if I want the good features offered by the navbar. I give below the simple steps I used to hide the navbar. The method consists in pasting a short html code to hide the navbar. If you remove the pasted code the navbar will reappear. That’s all. Here are the steps:

Sign in to your Blogger account and get the ‘Dashboard’. Click on ‘Design’ button. After obtaining the Design (Layout) window, click on ‘Edit HTML’ button as shown in the following figure.

Before proceeding further, you may save a copy of the template after expanding the widget templates (as a precautionary measure).

Here is the html code you need to paste:

#navbar {height: 0px;

visibility: hidden;
display: none;}

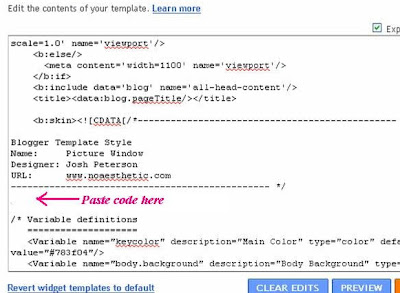
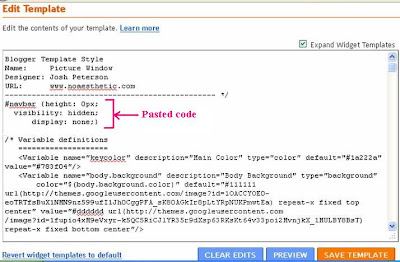
Now, paste the above html code as indicated in the following two figures.

The place where you may paste the code is shown in the figure above.

The figure below shows the code pasted.

After pasting the code, click on ‘SAVE TEMPLATE’ button at the bottom. Once the changes are saved in this manner, view your blog. You will find that the navbar is hidden.

If you want to enable the navbar, simply remove the above code you added and save the changes. The navbar will reappear.