When you disable or hide the navbar, you will lose the features offered in the navbar. The main reason why many bloggers hide or disable or remove the navbar is that the blog will get a little more professional look. But if you are still using the blogspot domain for publishing your blog, there is not much to gain by way of the professional look. If you are publishing your blog using your own custom domain (such as yourblog.com instead of yourblog.blogspot.com), your blog may look more professional even if you make use of the free hosting provided by Blogger.
I have disabled the navbar in a couple of my blogs. But I can enable it at any time if I want the good features offered by the navbar. I give below the simple steps I used to hide the navbar. The method consists in pasting a short html code to hide the navbar. If you remove the pasted code the navbar will reappear. That’s all. Here are the steps:
Sign in to your Blogger account and get the ‘Dashboard’. Click on ‘Design’ button. After obtaining the Design (Layout) window, click on ‘Edit HTML’ button as shown in the following figure.

Before proceeding further, you may save a copy of the template after expanding the widget templates (as a precautionary measure).
Here is the html code you need to paste:
#navbar {height: 0px;

  visibility: hidden;

      display: none;}
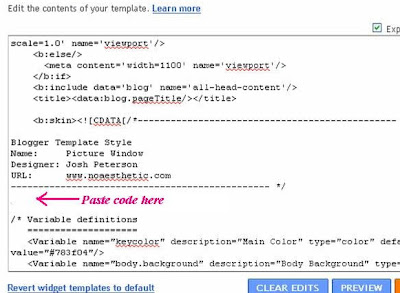
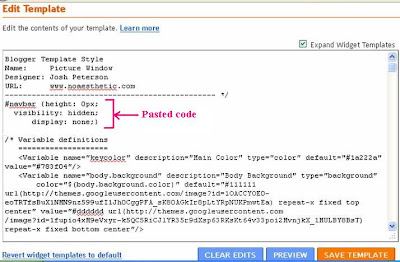
Now, paste the above html code as indicated in the following two figures.

The place where you may paste the code is shown in the figure above.
The figure below shows the code pasted.

After pasting the code, click on ‘SAVE TEMPLATE’ button at the bottom. Once the changes are saved in this manner, view your blog. You will find that the navbar is hidden.
If you want to enable the navbar, simply remove the above code you added and save the changes. The navbar will reappear.
Dumb question: if I disable the navbar, how can I log in to my blog as the editor?
ReplyDeleteHello Epic Adventurer!
ReplyDeleteYour navigation bar alone will be disabled. Your Dash Board will be intact and you can log in and edit as usual.
I just became alert to your blog through Google, and found that it's truly informative. I’m going to watch out for brussels. I will be grateful if you continue this in future. Lots of people will be benefited from your writing. Cheers!
ReplyDeleteClick Here : My Top Blogger Tricks